Decorating with Wall Decals

Decorating with Wall Decals
Add a Unique Personality to your Home Decor today!

Wednesday, May 31, 2017

Patriotic Fun with Star Stickers

http://www.walldecorplusmore.com/2-Inch-Star-Vinyl-Wall-Stickers-Peel-n-Stick-28pc/Patriotic holidays and summer festivities are fun opportunities to decorate with Star Vinyl Wall Stickers. They make it easy to ... jazz up your bike or car for the parade ... individualize your serving bowls at summer picnics ... decorate your door or window for summer ... apply to art or craft supply boxes ... decorate bean bag game boards ... give antique cream cans a pop of color ... you're only limited by your imagination.


Wall Decor Plus More has a great Star Vinyl Wall Stickers page. These 2 inch star stickers are available in scads of fun colors to go with any decor. Warm Grey, Red, and Traffic Blue colors are pictured above and below. Use just one color for impact, or mix them up to create your own unique design.

You can buy a set of 30 Star Vinyl Wall Stickers for ONLY $7.15. What a decor bargain!

These 2 inch star stickers are made of our indoor matte vinyl, so they won't harm your walls or other home surfaces. You can place these Star Vinyl Wall Stickers almost anywhere.

And they're so EASY to use–just peel them off the backing paper and stick them on. Kids really love these so let them help out with your project or give them a wall space and let them go at it!

Want more variety? Our 2 inch wall stickers are also available as hearts, dots, daisies, triangles, and arrows

Have fun with these Star Vinyl Wall Stickers. Check out our page and order yours today!

~Sallianne

Tuesday, May 30, 2017

Make Over Your Laundry Room

http://www.walldecorplusmore.com/Life-Is-Like-Laundry-Loads-of-Fun-Vinyl-Wall-Decal-Stickers-2-Color/


Is your Laundry Room crying out for a makeover? Has it become a catch-all you try to avoid? Time for a makeover! After all, the Laundry Room is where a lot of the "clean" happens for your family–let's make it attractive and functional. Tackle it as a Do it yourself project–it's fairly easy.

To start, figure out how you want the room to function: is it also a mudroom? a second bathroom? a sewing space? Decide exactly how you want it to look and where you want things to go. 

Next up: cleaning. Remove everything that will no longer live there. Sweep and mop the floor, wipe down shelves, scrub cabinets and appliances in and out, and clean your sink. (Don't forget to check lint traps, they can be a fire hazard.) Wash any windows and curtains. Now you're ready for decor–the fun part! 

Paint can be a big part of your Laundry Room makeover. Revamp with color! Choose a cheerful wall color that you find energizing.

Now let's reorganize! Get rid of the supplies you no longer use. Be sure there are handy shelves, rolling carts or cabinets for storage. You'll also need a place to fold clothes: a counter top (a drop-down one if space is tight) or a rolling cart with a counter on it. You'll need a sorting cart to separate colors and whites. Hooks or hanging bars and hangers can be used for drip-dry items and will save on ironing if you hang things up right out of the dryer. Use a fun patterned fabric to cover unsightly things like pipes under the sink. 

http://www.walldecorplusmore.com/Laundry-Room-Drop-your-Drawers-Here-Vinyl-Wall-Decal-Stickers-Wall-Letters/Laundry starts and ends in other rooms–mostly in bedrooms and kitchens. Choose different colored hampers, clothes baskets and hangers for each member of the family to make putting away clean laundry so much easier!

If your budget is big, bring in new machines! Or add a creative backsplash to brighten up the wall. Is your Laundry Room  tiny? Use curtains instead of doors with curtain rings that slide easily to improve function and color.  


At last–time to decorate! Check out the Wall stickers from Wall Decor Plus More, especially the Laundry Room sayings. There are lots of choices! Pick the one that makes you smile. Or add stripe or polka dot vinyl wall decals to create patterns that will liven up the space. Vinyl stickers are so easy to apply and remove–plus they won't harm your new paint. 

Whether you do laundry twice a day or every two weeks, a Laundry Room Makeover will make this chore a lot more pleasant. Get ready to smile!

~Sallianne

Saturday, May 27, 2017

Add Custom Charm with Mailbox Decals!


http://www.walldecorplusmore.com/mailbox-decals/
Your mailbox provides the first welcome to your home. What story does it tell? Is it dirty and dull? Is your house number hard to read?  Let's spruce it up with mailbox decals. Choose one of ours to add some custom charm. And to make sure your mail and your guests make it to the right place!

Check out our simple designs, or add creative flair with a floral monogram or a unique frame around your custom house number. If you live in an apartment, you can apply these vinyl decals right to your door–no paint damage to worry about either. Browse through the many designs of mailbox decals we offer.

Make it personal–choose an outdoor custom vinyl decal featuring our stick people to personalize it to your family. Friends and visitors will smile for sure!

Put the focus on your front door with custom mailbox lettering that features just your house number. Your address will be memorable and visible for delivery people and visitors.

http://www.walldecorplusmore.com/Personalized-Mailbox-Vinyl-Sticker-Decals-with-Framed-Address-and-Swirls-Basic-or-Jumbo-set-of-2/Select your decorative mailbox decal from many colors including black, white, pink, yellow, green, and more! And, all of our mailbox decals are made with outdoor vinyl. The stronger adhesive used will last up to ten years.

With some flowers or greenery tucked around your mailbox, your mailbox will make a charming welcome.
~Sallianne

Monday, May 15, 2017

4 Quality Purchase Points About Wall Stickers

We thought it might be helpful to clear up some of the confusion about types of walls stickers and how to choose a quality product.

http://www.walldecorplusmore.com/Our-Story-Wall-Letters-Vinyl-Wall-Decal-Stickers-19W-x-14H/Sometimes customers contact us with questions or problems using their wall stickers, especially those bought from competitors. After visiting with these customers, we knew the product they were struggling with was not ours, but we still wanted to help. Some of the problems included:

• trying to remove a sticker that was pulling off the paint (see #2 and #3 below);

• being unsure how to apply a sticker printed on sticky plastic instead of being die-cut (see #4)


Four indicators of quality to help you purchase your wall sticker:

1. Read the application instructions before you purchase. This will clue you in to how well the product is made. If the manufacturer is sending you a film to apply to the sticker, that's a big red flag–a reputable wall sticker manufacturer has already applied this transfer film to the wall sticker. If you have to add this yourself and don't have a lot of experience, you may get wrinkles, crooked lettering, etc., making a quality wall sticker application nearly impossible. We often see this type of problem on wall stickers from China and Hong Kong.

2. Determine that the material is designed for Home Décor use. Vinyl stickers for signage use existed a long time before Home Décor wall stickers became popular. Those for signs need super strong adhesive to withstand outdoor elements–PLUS they need to be glossy to attract attention. Neither Glossy nor Strong Adhesive types are good for Home Décor use.

3. Choose Matte finish for the best Home Décor use. The non-shiny look of a Matte finish wall sticker allows it to look like a custom paint application. All high-quality wall stickers have this Matte finish.

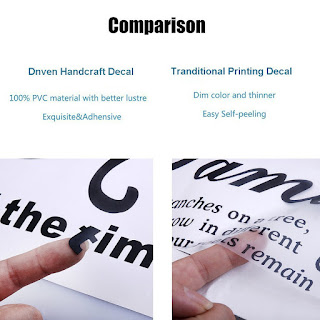
Comparing Die Cut Decals to Cheap Printed Stickers4. Find out if the item is a Die-cut Decal; you don't want an image printed on sticky plastic. This is extremely important! A die-cut decal has no background permanently attached to it or surrounding it (ie. no sticky clear plastic), just the die-cut lettering/design itself that will go right on the wall. Some cheap wall decals are not actually decals–they are just a design printed on sticky plastic material, which does not adhere well to anything except smooth surfaces. Plus, the clear plastic looks tacky on your wall.

When you purchase from WallDecorPlusMore.com, you can trust the quality of the vinyl wall decals we offer–they are designed especially for use on the walls of your home, or on other surfaces such as glass, etc. Our descriptions and usage recommendations are informative, and we are always here to answer questions. Let us help you choose the product that will result in the quality image you desire.
~Sallianne

Purchase from WallDecorPlusMore.com for High-Quality Wall Stickers for Home Décor use.

Friday, May 12, 2017

Stickers for Graduation–Personalization is FREE!

No extra charge for personalization on this graduation wall sticker. Makes a great gift for the graduate, and a party decoration as well! At WallDecorPlusMore.com we offer several vinyl decals with a graduation theme, including some (like the one below) that can be personalized, whether your special student is graduating from college or high school - or even kindergarten!


The personalized graduation sticker shown above gives you an idea of what can be done. This one is a combination of personalization and our Subway Art sticker. The personalization is FREE on this sticker and includes Name, Class Year, and School Initials.

This wall sticker can be applied to any smooth or semi-smooth surface. The one above is applied to a tile, the kind you can find at most Home Improvement stores for $1-$2. Portability makes it easy to take along for the graduate on the move. They can hang it on a wall or lean it up in a bookcase or on a desk.

Browse through our other graduation stickers for use at the big celebration. Apply them to walls, to a glass block, to vases, to a framed photo of the graduate - there are countless ways to acknowledge your graduate for this fine achievement.

To order your graduation wall stickers today, simply click onto: http://www.walldecorplusmore.com/graduation-decals/

And congratulations, graduates!

~Sallianne

Saturday, May 6, 2017

Tips to Help You Paint Like a Pro

You can easily change the look of a room in a single day with a fresh coat of pain in an existing or new color. Painting your walls is the single most dramatic way to refresh the interior of your home and make it warm and welcoming. Paint color is one of the base layers of home decor and is best done before updating furniture and accessories. Let's get started!

The keys to a successful paint job are planning and preparationIt doesn't have to be difficult. Let's assume you've chosen your color and, with the help of your local paint or hardware store, bought the correct paint finish for your project (flat, satin, eggshell, high gloss, enamel). Don't be afraid to ask those trained paint experts for help.

The tips below will help you paint like a pro, with amazing results.

Gather Tools and Supplies

These might vary from job to job, and will depend on what you have on hand, but the basics remain the same.
  • Rollers, roller covers with the correct nap for your wall texture, and an extension pole
  • 1"- 2" brush for cutting in and small spaces - angled brushes work best
  • Paint tray and liners
  • Drop cloths and rags
  • Painter's tape (the blue tape)
  • Spackle paste and a putty knife to fill holes

Prep the Room

This step will protect furniture and floors, plus the finished product will look better and last longer.
  • Remove drapes, small furniture, wall hangings, etc.  
  • Remove switch plates and hardware, if possible
  • Use masking tape or plastic to cover anything you can't remove 
  • Small items (like screws) can be covered with vaseline or chapstick (easy to wipe off later)
  • Move larger furniture items to the center of the room and cover with a drop cloth 
  • Tape off woodwork and make sure plastic dropcloths are taped down securely
  • Clean surfaces as needed (wipe off dust and remove loose items or particles) 
  • Spackle holes as needed and let dry per directions on container

Paint the Room  

Usually, painting starts with "cutting in" (painting the edges about 2" deep). Then do the ceiling next (if you are painting it), then the walls, and finally the woodwork.
  • If you have a steady hand while using a stiff 2" brush, you can skip the tape for cutting in; but be sure to have a damp cloth available for quick wipe-ups
  • Use short back-and-forth strokes to apply paint, but always finish with long, smooth strokes 
  • Dip your brush about halfway into the paint to avoid glopping up the brush and ruining it
  • When using a roller, work in 3 foot sections at a time, rolling a "W" on the wall, then filling in
  • Almost any color looks better with a second coat, even if the can says one-coat coverage 
  • Make sure the paint is dry before applying the second coat
  • Here's a great video with more details on painting a room:


    Click on this link for more tips on painting:
  • 47 Tips and Tricks for a Perfect Paint Job 
http://www.walldecorplusmore.com/bedroom-love-wall-decals-quotes/

Clean-up 

This may be the least fun part, but once you've put everything back in the room, you can enjoy the results!

Do let a newly painted room dry or cure for at least 2 weeks before applying any Wall Stickers. Wall decals are great for adding "art" to any room, and they come in 30 different colors. When it's time to change them, wall stickers are easy to remove and won't ruin your wonderful new paint job!

~Sallianne